If you want to expand your cryptocurrency horizons and explore new possibilities, adding a Polygon network to Metamask is a smart move. With Polygon, you can access a range of decentralized applications (DApps) and take advantage of low-fee transactions and fast confirmation times. This step-by-step guide will explain how to add and connect Metamask with the Polygon network, allowing you to seamlessly integrate it into your existing wallet.
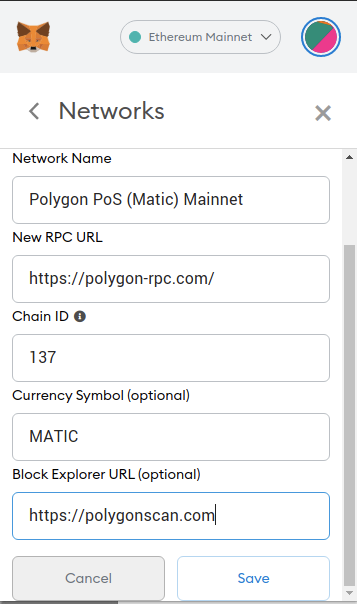
To begin, you’ll need to add the Polygon network to your Metamask wallet. Open your Metamask extension, click on the network selection dropdown, and select “Custom RPC.” In the popup, you need to enter the following details:
- Network Name: Polygon
- New RPC URL: https://rpc-mainnet.maticvigil.com/
- Chain ID: 137
- Symbol: MATIC
- Block Explorer URL: https://explorer.matic.network/
Once you’ve entered all the details, click on “Save” to add the Polygon network to your Metamask wallet. Now, you’re ready to connect Metamask with the Polygon network.
To connect Metamask with the Polygon network, you’ll need to switch your network selection to “Polygon.” You can do this by clicking on the network selection dropdown and selecting “Polygon.” Once you’ve done that, you’ll be connected to the Polygon network, and your Metamask wallet will be integrated with Polygon.
Now that you’ve added and connected Metamask with the Polygon network, you can start exploring the wide range of DApps and opportunities that Polygon has to offer. Whether you want to participate in decentralized finance (DeFi) protocols, trade non-fungible tokens (NFTs), or engage with other blockchain-based applications, Polygon provides you with a seamless and efficient way to do so. Enjoy the benefits of low fees, fast confirmation times, and a vibrant ecosystem by adding Polygon to your Metamask wallet today!
Connecting Polygon to Metamask
Integrating Polygon with Metamask allows you to access and interact with the Polygon network directly from your Metamask wallet. To connect Polygon to Metamask, follow these steps:
- Add the Polygon Network to Metamask:
- Connect Metamask to Polygon:
- Start Using Polygon with Metamask:
To add the Polygon network to Metamask, open your Metamask wallet and click on the network dropdown menu. From the dropdown, select “Custom RPC”.
In the “New RPC URL” field, enter the following URL: “https://rpc-mainnet.maticvigil.com”.
Enter “Polygon” as the network name and “MATIC” as the currency symbol (optional).
Click “Save” to add the Polygon network to Metamask.
After adding the Polygon network, you can connect Metamask to Polygon by selecting the Polygon network from the network dropdown menu in your Metamask wallet.
Make sure you have some Polygon (MATIC) tokens in your Metamask wallet to use on the Polygon network.
Once connected to the Polygon network, you can now start using Polygon with Metamask. This includes interacting with Polygon-based decentralized applications (dApps), sending and receiving Polygon (MATIC) tokens, and participating in the Polygon ecosystem.
Make sure to only connect to trusted dApps and exercise caution when sending tokens or interacting with smart contracts.
By following these steps, you can easily connect Polygon to Metamask and enjoy seamless access to the Polygon network.
Including Polygon to Metamask
To connect your Metamask wallet with the Polygon network, you need to integrate Polygon with Metamask. Here’s how you can add Polygon to Metamask:
- Open the Metamask wallet extension.
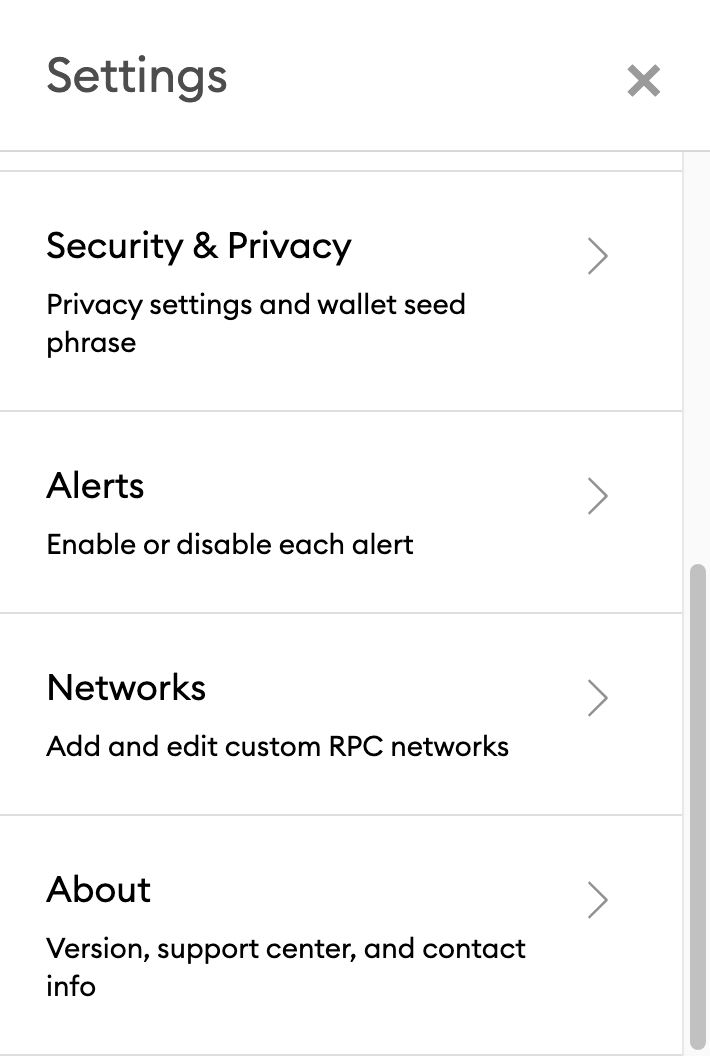
- Click on the profile icon in the top right corner and select “Settings”.
- In the Settings menu, click on “Networks” in the left sidebar.
- Scroll down to the bottom and click on “Add Network”.
- In the “Network Name” field, enter “Polygon”.
- In the “New RPC URL” field, enter the RPC URL for the Polygon network: “https://rpc-mainnet.matic.network” for the mainnet or “https://rpc-testnet.matic.network” for the testnet.
- In the “Chain ID” field, enter the chain ID for the Polygon network: 137 for the mainnet or 80001 for the testnet.
- In the “Currency Symbol” field, enter “MATIC” for the mainnet or “MATIC Testnet” for the testnet.
- In the “Block Explorer URL” field, enter “https://explorer.matic.network” for the mainnet or “https://explorer-mumbai.maticvigil.com” for the testnet.
- Click on “Save” to add the Polygon network to Metamask.
Once you have added the Polygon network to Metamask, you can connect with dApps and interact with the Polygon ecosystem seamlessly.
Integrating Polygon with Metamask
To connect and integrate Polygon with Metamask, you’ll need to follow a few simple steps. This guide will outline how to include Polygon on Metamask and how to connect the two for seamless integration.
Step 1: Add the Polygon Network to Metamask
- Open your Metamask extension in your browser.
- Click on the network selection dropdown (where it shows “Ethereum Mainnet” by default).
- Scroll down to the bottom and click on “Custom RPC”.
- In the “RPC URL” field, enter the following URL: https://rpc-mainnet.maticvigil.com/
- Enter “Polygon” in the “Network Name” field.
- In the “Chain ID” field, enter “137”.
- Click “Save” to add the Polygon network to your Metamask.
Step 2: Connect Metamask with Polygon

- Ensure that you have some Matic tokens in your Metamask wallet.
- Open your Metamask extension in your browser.
- Click on the network selection dropdown, and select “Polygon” from the list.
- In your Metamask wallet, click on the “Account 1” dropdown and select “Polygon” to switch to the Polygon network.
- You are now connected to the Polygon network via Metamask. You can start using Polygon-enabled dapps and services.
By following these steps, you can seamlessly integrate and connect Polygon with Metamask, allowing you to take advantage of the features and functionalities of the Polygon network.
Configuring Metamask for Polygon
In order to connect and integrate Metamask with Polygon, you will need to follow a few steps:
- Install Metamask: Start by installing the Metamask extension on your web browser. Metamask is available for Google Chrome, Mozilla Firefox, and Brave browsers. Simply search for “Metamask” in the extension store of your preferred browser and install it.
- Create an Account: Once Metamask is installed, open it and follow the prompts to create a new account. Make sure to store your seed phrase in a safe place, as it is the only way to restore your wallet if necessary.
- Switch to the Polygon Network: By default, Metamask is connected to the Ethereum Mainnet. To switch to the Polygon network, click on the network selection dropdown at the top of the Metamask window and select “Custom RPC.”
- Configure the Polygon Network: In the network configuration settings, you will need to provide the following information to connect to the Polygon network:
- Network Name: Enter a name for the network (e.g., “Polygon” or “Matic”).
- New RPC URL: Enter the RPC URL for the Polygon network. The RPC URL for Polygon is usually “https://rpc-mainnet.maticvigil.com/” or “https://rpc-mainnet.matic.network/”.
- Chain ID: Enter the Chain ID for Polygon. The Chain ID for the Polygon Mainnet is usually 137.
- Save and Connect: After providing the necessary information, click on the “Save” button to save the network configuration. Metamask will now be connected to the Polygon network.
After following these steps, you should be able to use Metamask with Polygon and take advantage of the features and functionality offered by the Polygon network.
Creating a Polygon Account on Metamask
To begin using the Polygon Network on Metamask, you will need to add it as a network in your Metamask wallet. Follow the steps below to integrate Polygon with Metamask:
- Open your Metamask wallet. If you don’t have it installed, download and install it from the official Metamask website.
- Once you have opened Metamask, click on the network selection dropdown at the top, next to the Metamask logo. By default, it should say “Main Ethereum Network”.
- In the dropdown, click on “Custom RPC” to add a custom network.
- In the “Network Name” field, enter a name for the network. You can name it “Polygon” or any other name of your choice.
- In the “New RPC URL” field, enter the RPC URL for the Polygon Network. The RPC URL for the Polygon Mainnet is https://rpc-mainnet.maticvigil.com/.
- Add the chain ID for the Polygon Mainnet, which is 137.
- Optionally, you can also add the Symbol and Block Explorer fields, but they are not necessary for connecting to the Polygon Network.
- Click on “Save” to add the Polygon Network to your Metamask wallet.
- After saving, you will see the new network added to your network selection dropdown. Click on it to connect to the Polygon Network.
- Once connected to the Polygon Network, you can now use Metamask with Polygon and interact with dApps and smart contracts on the Polygon Network.
By following these instructions, you have successfully created a Polygon account on Metamask and connected it to the Polygon Network. Now you can start using Metamask with Polygon and take advantage of the benefits of the Polygon Network.
Setting up Polygon on Metamask

To connect with the Polygon network and add it to your Metamask wallet, follow these steps:
- Open your Metamask wallet and click on the network selection dropdown at the top of the interface.
- Select “Custom RPC” from the options.
- In the “Network Name” field, enter the name “Polygon”.
- In the “New RPC URL” field, enter the URL provided by Polygon to connect with their network.
- In the “Chain ID” field, enter the Chain ID associated with the Polygon network.
- Click on the “Save” button to add the Polygon network to Metamask.
Note: Make sure you have the latest version of Metamask installed before proceeding with these steps.
Once you have successfully added the Polygon network to Metamask, you can now integrate it with various decentralized applications (dApps) and start using the Polygon network for transactions and interactions.
Adding Polygon Network to Metamask
Metamask is a popular browser extension that allows users to connect with different blockchain networks and interact with decentralized applications (dApps). By default, Metamask supports the Ethereum network, but with a few simple steps, you can also add the Polygon network to your Metamask wallet.
Integrating Polygon with Metamask
To integrate the Polygon network with Metamask, follow these steps:
- Open the Metamask extension in your browser and ensure you are on the main page.
- Click on the network dropdown menu located at the top of the Metamask window. By default, it should display “Ethereum Mainnet.”
- Select “Custom RPC” from the dropdown menu.
- A form will appear where you can input the network details. Fill in the following information:
| Network Name | Polygon |
|---|---|
| New RPC URL | https://rpc-mainnet.maticvigil.com/ |
| Chain ID | 137 |
| Symbol | MATIC |
| Block Explorer URL | https://explorer.matic.network/ |
Once you have filled in the details, click on the “Save” button.
Connecting to the Polygon Network
Now that you have added the Polygon network to Metamask, you can connect to it easily:
- Click on the network dropdown menu again, and you should see “Polygon” as an option.
- Select “Polygon” from the dropdown menu, and Metamask will switch to the Polygon network.
That’s it! You have successfully added and connected to the Polygon network on Metamask. You can now explore and interact with dApps and tokens on the Polygon network directly through your Metamask wallet.
Note: Make sure to switch back to the Ethereum network if you want to use Ethereum dApps or tokens. You can switch networks anytime by selecting the appropriate option from the network dropdown menu.
Switching to Polygon Network on Metamask

If you want to integrate Polygon Network with your Metamask wallet, here is a step-by-step guide on how to do it:
- Open the Metamask extension in your browser and click on the profile icon.
- Click on “Settings” from the dropdown menu.
- In the “Settings” menu, click on “Networks.”
- Scroll down and click on “Add Network.”
- A new dialog box will appear where you need to fill in the following details:
- Network Name: Enter “Polygon” or any preferred name.
- New RPC URL: Enter the RPC URL for Polygon. It should be “https://rpc-mainnet.matic.network” for the mainnet or “https://rpc-testnet.matic.network” for the testnet.
- Chain ID: Enter “137” for the mainnet or “80001” for the testnet.
- Symbol: Enter “MATIC” or any preferred symbol.
- Block Explorer URL: Enter “https://explorer.matic.network” or any preferred block explorer URL.
- Click on “Save” to add the Polygon Network to your Metamask wallet.
- You can now switch to the Polygon Network by clicking on the network dropdown menu in Metamask and selecting “Polygon” or the name you provided.
By following these steps, you will be able to connect and integrate Metamask with the Polygon Network, allowing you to interact with dApps, tokens, and other services on the Polygon Network.
Transferring Assets on Polygon Network via Metamask
When it comes to transferring assets on the Polygon network, one of the most popular and convenient methods is by using the Metamask wallet. Metamask is a browser extension that allows users to connect with various blockchain networks, including Polygon.
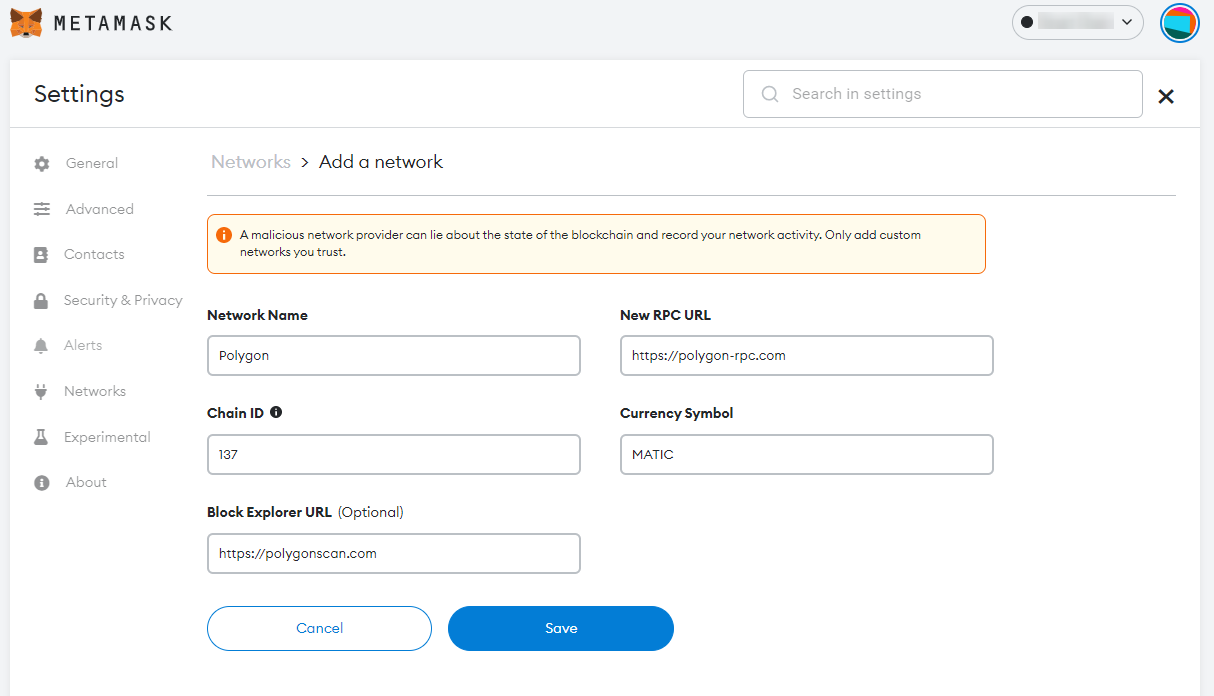
How to Add Polygon Network to Metamask
- Open your Metamask extension in your web browser.
- Click on the account avatar at the top right corner and select “Settings”.
- In the settings menu, click on “Networks” and then select “Add Network”.
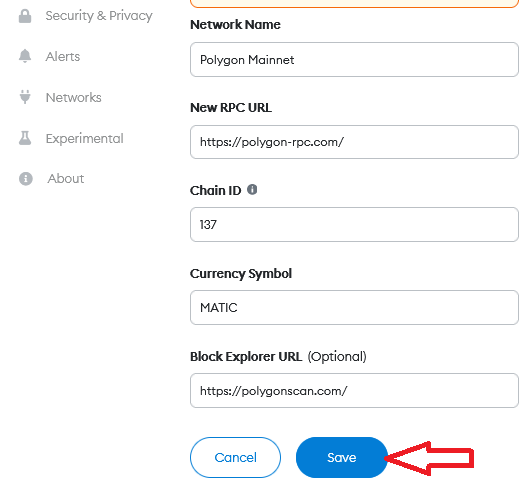
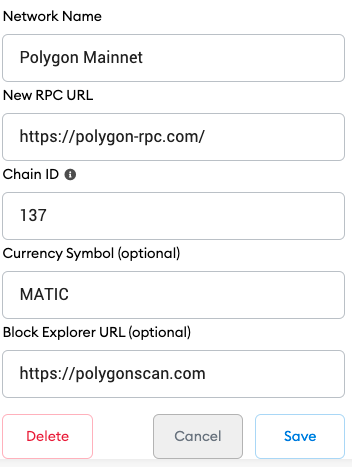
- Enter the following information to add the Polygon network:
- Network Name: Polygon Mainnet
- New RPC URL: https://polygon-rpc.com/
- Chain ID: 137
- Currency Symbol: MATIC
- Block Explorer URL: https://polygonscan.com/
- Click “Save” to add the Polygon network to your Metamask wallet.
Once you have successfully added the Polygon network to Metamask, you can now transfer assets on the Polygon network.
How to Transfer Assets on Polygon Network via Metamask
- Open your Metamask extension and make sure you are connected to the Polygon network.
- Click on the “Send” button.
- Enter the recipient’s wallet address and the amount of assets you want to transfer.
- Review the transaction details and confirm the transfer.
- Wait for the transaction to be confirmed on the Polygon network.
- You can track the progress of the transaction by clicking on the transaction hash in Metamask or by using the block explorer URL you added for the Polygon network.
It’s important to note that when transferring assets on the Polygon network via Metamask, you will need to have enough MATIC tokens in your wallet to cover the transaction fees. These fees are usually denominated in MATIC and are required to process the transaction on the network.
With the steps outlined above, you now know how to integrate and use Metamask to connect with the Polygon network and transfer assets seamlessly. Make sure to follow the instructions carefully and double-check the network settings before making any transactions.
Using Metamask with Polygon DApps
If you want to add the Polygon network to your Metamask wallet and start using Polygon DApps, you’ll need to follow a few simple steps:
1. Add the Polygon network to Metamask
- Open your Metamask wallet extension in your web browser.
- Click on the network selection dropdown and choose “Custom RPC”.
- In the “New RPC URL” field, enter the following URL: https://rpc-mainnet.maticvigil.com/.
- Give a name to the network, such as “Polygon Mainnet”.
- Click on “Save” to add the Polygon network to Metamask.
2. Integrate Polygon with your DApp
To integrate Polygon with your DApp, you’ll need to connect to the Polygon network using Metamask. Here’s how:
- First, make sure your DApp supports the Polygon network. If it doesn’t, you’ll need to modify your DApp’s smart contracts and frontend code to add support for Polygon.
- Next, prompt your users to connect their Metamask wallet to your DApp.
- When connecting, make sure to specify that the user should connect using the Polygon network.
- Once connected, your DApp should be able to interact with the Polygon network using the user’s Metamask wallet.
3. Include instructions for users
When releasing your DApp, make sure to include clear instructions for users on how to add the Polygon network to Metamask and connect to your DApp. This will help users who are new to Polygon and Metamask get started quickly.
By following these steps, you can add the Polygon network to Metamask, integrate Polygon with your DApp, and allow users to connect with Metamask and interact with your DApp on the Polygon network.
Securing Your Polygon Network on Metamask
When adding a Polygon network to Metamask, it is important to take steps to ensure the security of your assets and transactions. Here are some tips on how to securely connect, integrate, and include the Polygon network with Metamask:
1. Connect Polygon Network to Metamask
- Open your Metamask extension or mobile app.
- Click on the network selector dropdown and choose “Custom RPC”.
- In the “New RPC URL” field, enter the Polygon RPC URL provided.
- Click “Save” to add the Polygon network to Metamask.
2. Enable Network Integration with Metamask
- Make sure you are on the Polygon network in Metamask.
- Click on the menu icon in the top right corner of the Metamask extension or app.
- Select “Settings” from the dropdown menu.
- In the “Advanced” tab, enable the “Hexadecimal” option for chain IDs.
- Click “Save” to apply the changes.
3. Include Additional Security Measures
- Consider using a hardware wallet or cold storage solution for added security.
- Enable two-factor authentication (2FA) for your Metamask account.
- Regularly check for and install updates to the Metamask extension or app.
- Avoid sharing your recovery phrase or private key with anyone.
4. How to Safely Use Metamask with Polygon
- Double-check the website or dApp you are using when conducting transactions on the Polygon network.
- Verify the URL and ensure it is secure (https://) and legitimate.
- Be cautious of phishing attempts and avoid clicking on suspicious links.
- Review transaction details and gas fees before confirming any transactions.
- Consider using a gas fee tracker to estimate and optimize transaction costs.
By following these steps and best practices, you can help secure your Polygon network on Metamask and protect your digital assets.
Troubleshooting Polygon Network Issues on Metamask
If you are experiencing issues with connecting or integrating the Polygon network with your Metamask wallet, there are several troubleshooting steps you can take to resolve the problem.
1. Check Metamask Version
Make sure you are using the latest version of Metamask. Outdated versions may not have support for the Polygon network or may have bugs that cause issues with connecting.
2. Add Polygon Network to Metamask
Ensure that you have added the Polygon network to your Metamask wallet correctly. To do this, follow these steps:
- Click on the Metamask extension icon in your browser toolbar to open the Metamask interface.
- Click on the network dropdown and select “Custom RPC”.
- In the “New Network” form, enter the following details:
- Network Name: Polygon
- New RPC URL: https://rpc-mainnet.maticvigil.com/ (for the mainnet) or https://rpc-testnet.maticvigil.com/ (for the testnet)
- Chain ID: 137 (for the mainnet) or 80001 (for the testnet)
- Symbol: MATIC
- Block Explorer URL: https://explorer-mainnet.maticvigil.com/ (for the mainnet) or https://explorer-mumbai.maticvigil.com/ (for the testnet)
- Click “Save” to add the Polygon network to your Metamask.
3. Clear Metamask Cache
If you are still experiencing issues, try clearing the cache of your Metamask wallet. To do this, follow these steps:
- Click on the Metamask extension icon in your browser toolbar to open the Metamask interface.
- Click on the menu icon (three horizontal lines) in the top-right corner.
- Select “Settings” from the dropdown menu.
- Click on the “Advanced” tab.
- Scroll down to the “Reset Account” section.
- Click on the “Reset Account” button.
- Confirm the action by clicking “Reset”.
4. Test on a Different Browser
If the issue persists, try using a different browser to see if the problem is specific to your current browser. Sometimes, certain browser extensions or configurations can interfere with the functioning of Metamask.
5. Seek Help from the Community
If none of the above steps resolve the issue, reach out to the Metamask community for assistance. There are several forums and social media channels where you can ask for help and get guidance from experienced users and developers.
Frequently asked questions:
Videos:
Connect MetaMask to Polygon Network | Step by step guide in Hindi || Stephen SIMON
I just followed this guide and added the Polygon network to my Metamask wallet. It was super easy! Now I can access Polygon-based dapps and tokens with just a few clicks. Thanks for the step-by-step instructions!
Thanks for the step-by-step guide! I’ve just added the Polygon network to my Metamask wallet and it was a breeze. Now I can explore all the exciting Polygon-based dapps and tokens. Keep up the good work!
Is adding the Polygon network to Metamask safe and secure? I want to make sure my wallet is protected.
Adding the Polygon network to Metamask is absolutely safe and secure. Metamask has a strong reputation in the crypto community and takes security seriously. Just make sure to double-check the RPC URL and other details when adding the network. With Polygon on Metamask, you’ll have access to a wide range of dapps and tokens, while keeping your wallet protected. Happy exploring!
How secure is the Polygon network? Are there any risks associated with integrating it with Metamask?
The Polygon network is known for its strong security measures, making it a reliable option for integrating with Metamask. The network utilizes a combination of security protocols, including checkpoints and staking mechanisms, to ensure the protection of user funds and data. While no system is completely risk-free, Polygon has a solid track record and has been audited by renowned security firms. As always, it’s important to exercise caution and follow best practices when interacting with any blockchain network.
Adding a Polygon network to Metamask was a game-changer for me. Now I can seamlessly access Polygon-based dapps and tokens with low fees and fast transactions. This step-by-step guide made it so easy to integrate Metamask with the Polygon network. Highly recommend trying it out!
Adding the Polygon network to Metamask was such a breeze! I love how easy it is to connect and integrate new networks. Polygon has opened up a whole new world of possibilities for me in the crypto space. The low-fee transactions and fast confirmation times are incredible. Highly recommend!
Adding the Polygon network to Metamask was a breeze! Now I can easily access Polygon-based dapps and tokens. Thanks for the step-by-step guide!
This is a great tutorial! Adding the Polygon network to Metamask has opened up a whole new world of opportunities for me. I can now access different dapps and make low-fee transactions. Thank you for the step-by-step guide!
As a crypto enthusiast, I have to say that adding the Polygon network to Metamask is a game-changer! It opens up a whole new world of possibilities with decentralized applications and fast transactions. I’m excited to explore what Polygon has to offer. Thanks for the step-by-step guide!
Adding a Polygon network to Metamask is a game-changer. It opens up a whole new world of opportunities and allows for seamless integration with Polygon-based dapps and tokens. I’ve been using it for a while now and the low-fee transactions and fast confirmation times are a game-changer. Highly recommended!
Great article! I followed the steps and successfully added Polygon to my Metamask wallet. Now I can explore new dapps and enjoy low-fee transactions. Thanks for the guide!
Adding a Polygon network to Metamask is the best decision I’ve made! Now I can easily explore a wide range of DApps and enjoy fast transactions. The step-by-step guide was very helpful in integrating Polygon into my Metamask wallet.
Adding a Polygon network to Metamask has made my life so much easier. Now I can easily access Polygon-based dapps and tokens with low-fee transactions and fast confirmation times. Metamask is definitely the best wallet for cryptocurrency enthusiasts like me!
Adding the Polygon network to Metamask was a breeze! Now I can enjoy the benefits of low-fee transactions and fast confirmation times. Thanks for the step-by-step guide!
This guide is really helpful for those who want to explore the Polygon network. I followed the steps and added it to my Metamask wallet smoothly. Now I can easily access Polygon-based dapps and tokens. Thank you!
This guide is incredibly helpful! I’ve been wanting to explore Polygon and this step-by-step tutorial made it so easy to add and connect it to my Metamask wallet. Now I can access Polygon-based DApps and tokens with ease. Thank you!
Is it possible to add multiple networks to Metamask, or can you only have one network at a time?
Yes, it is indeed possible to add multiple networks to Metamask. You can add and switch between different networks by following similar steps mentioned in the article. Just repeat the process for each network you want to add. Happy exploring!
Adding a Polygon network to Metamask was a breeze with this step-by-step guide! Now I can easily access Polygon-based dapps and tokens. The low-fee transactions and fast confirmation times are a game-changer for my cryptocurrency experience!
Adding a Polygon network to Metamask seems like a great way to expand my cryptocurrency horizons. I can’t wait to explore all the decentralized applications and take advantage of the low fees and fast confirmation times. This step-by-step guide makes it so easy to integrate Polygon with my existing wallet. Exciting times ahead!
I followed this guide and successfully added the Polygon network to my Metamask wallet. Now I can easily access Polygon-based dapps and tokens without any hassle. It’s a great addition for expanding my cryptocurrency horizons.
Adding a Polygon network to Metamask was super easy! I followed the step-by-step guide and it worked like a charm. Now I can access all the Polygon-based dapps and tokens with just a few clicks. Highly recommended!
Adding the Polygon network to Metamask was a game-changer for me. Now I can easily access Polygon-based dapps and tokens with low fees and fast confirmation times. Thanks for the step-by-step guide!
I tried adding Polygon to Metamask using this guide, and it was incredibly easy! Now I can access a whole new range of DApps and enjoy fast transactions with low fees. Highly recommend!
Adding a Polygon network to Metamask was a breeze! The step-by-step guide provided clear instructions and made it easy for me to integrate Polygon into my wallet. Now I can explore all the exciting decentralized applications and enjoy low-fee transactions. Thank you for this helpful article!
I found this guide very helpful in adding the Polygon network to my Metamask wallet. Now I can easily access Polygon-based dapps and tokens. Thank you for the step-by-step instructions!
This guide was incredibly helpful! I followed the steps and successfully added the Polygon network to my Metamask wallet. Now I can easily access Polygon-based dapps and tokens. Thank you!
Adding the Polygon network to Metamask was such a breeze! Now I can easily access Polygon-based dapps and tokens. It’s a game-changer for my crypto portfolio.
This step-by-step guide is very helpful! I followed the instructions and successfully added the Polygon network to my Metamask wallet. Now I can easily access Polygon-based dapps and tokens. Thank you for the clear instructions!
Hey, I followed the steps mentioned in this article to add Polygon to my Metamask wallet. However, I’m not able to see the Polygon network option in the network selection dropdown. Am I missing something?
Hi BlockchainLover22, don’t worry, I had the same issue when I first tried adding the Polygon network. Make sure you have the latest version of Metamask installed. Sometimes, restarting your browser or clearing your browser cache can help. If the Polygon network still doesn’t appear, you can try adding it manually. Go to the network selection dropdown, click on “Custom RPC,” and enter the details provided in the article. Hope this helps!
Could you please provide more information on the benefits of using Polygon on Metamask?
Sure, crypto_master! Adding the Polygon network to Metamask brings several benefits. Firstly, you gain access to a wide range of decentralized applications (DApps) and tokens on the Polygon network. Additionally, you can enjoy low-fee transactions and fast confirmation times, making your cryptocurrency experience more efficient. By integrating Polygon with Metamask, you expand your horizons in the world of cryptocurrency and can explore new possibilities. Give it a try!
Adding a Polygon network to Metamask was a breeze! The step-by-step guide provided all the necessary details, and now I can access Polygon-based dapps and tokens seamlessly. Definitely a smart move for expanding my cryptocurrency horizons!
I just added the Polygon network to my Metamask wallet using this guide, and it was super easy. Now I can access all the Polygon-based DApps and tokens with just a few clicks. Thanks for the step-by-step instructions!
Adding a Polygon network to Metamask seems like a great idea, especially if you’re into exploring new opportunities in the world of cryptocurrency. With Polygon, you can enjoy low-fee transactions and fast confirmation times, which is a huge advantage. This step-by-step guide makes it easy to add and connect Metamask with the Polygon network, allowing you to access a variety of DApps and tokens. Definitely worth a try!
Adding Polygon to Metamask was really easy following this step-by-step guide. I’m excited to explore the range of decentralized applications and take advantage of fast transactions on the Polygon network. The instructions were clear and I had no issues integrating it with my wallet. Highly recommend!
Adding the Polygon network to Metamask was so easy with this step-by-step guide! Now I can access a whole new range of DApps and enjoy fast transactions. Thanks for the clear instructions!
Is Polygon network supported by all Metamask wallets? How can I benefit from using it?
Yes, Polygon network is supported by all Metamask wallets. By adding Polygon to Metamask, you can access a wide range of decentralized applications (DApps) and take advantage of low-fee transactions and fast confirmation times. It opens up new possibilities for exploring the world of cryptocurrencies. Give it a try!
I’ve been using Metamask for a while now, and adding the Polygon network was a game-changer. It’s so easy to connect and the low fees make transactions a breeze. Highly recommend it!
This guide is incredibly helpful! I followed the steps and successfully added the Polygon network to my Metamask wallet. Now I can easily access Polygon-based dapps and tokens. Thank you!
Can I use this with any cryptocurrency or only with Polygon-based dapps and tokens?
Hi Emma22! You can use Metamask with various cryptocurrencies, not just Polygon-based dapps and tokens. Adding Polygon as a network simply allows you to access Polygon-specific features and dapps in addition to other supported cryptocurrencies. Enjoy exploring the possibilities!
Adding the Polygon network to Metamask was a breeze! Now I can easily explore Polygon-based dapps and enjoy low-fee transactions. The step-by-step guide was super helpful in integrating everything smoothly into my wallet.
Could you clarify the process for setting up the Polygon network on Metamask? I’m a bit confused about the details mentioned in the article.
Sure, Emily1987! Setting up the Polygon network on Metamask is simple. Just follow the steps mentioned in the article to add the network details (Network Name: Polygon, RPC URL: https://rpc-mainnet.maticvigil.com/, Chain ID: 137, Symbol: MATIC, Block Explorer URL: https://explorer.matic.network/) and you’ll be all set to explore Polygon-based dapps and tokens. Happy exploring!
How does adding Polygon to Metamask affect the security of my wallet and transactions?
Adding Polygon to your Metamask wallet does not compromise the security of your wallet or transactions. By integrating Polygon, you are expanding the range of possibilities for your wallet without sacrificing its security features. Polygon operates as a separate network within Metamask, ensuring that your wallet remains secure while allowing you to access Polygon-based dapps and tokens easily. It is a convenient way to explore new horizons in the crypto space while keeping your assets safe.
Adding a Polygon network to Metamask is a great way to broaden your crypto horizons. Polygon offers a variety of DApps and ensures quick, low-fee transactions. Following this step-by-step guide, you can seamlessly integrate Metamask with the Polygon network for a smoother crypto experience.
Adding Polygon to Metamask is a fantastic idea! It opens up a whole new world of possibilities for cryptocurrency enthusiasts. Integrating Polygon with Metamask is straightforward and allows for seamless access to a variety of DApps and tokens. Thanks for the detailed guide on how to set it up!
Adding the Polygon network to Metamask opens up exciting opportunities to explore various decentralized applications and enjoy the benefits of low-fee transactions and fast confirmation times. It’s a strategic move for those looking to broaden their cryptocurrency horizons!
Adding a Polygon network to Metamask is a game-changer! I’ve been exploring DApps and making transactions with low fees effortlessly. Thanks for the simple step-by-step guide!
How secure is it to add a new network like Polygon to Metamask? Are there any risks involved in integrating it with my wallet?
Hey CarolCrypto! Adding Polygon to Metamask is generally safe as long as you carefully enter the correct network details. Make sure to verify the RPC URL and other information from official sources to mitigate any risks. Integrating Polygon with your wallet can actually enhance your crypto experience by providing access to a wide range of DApps with lower fees and faster transactions. Enjoy exploring the Polygon network!
Adding Polygon to Metamask is such a game-changer! Now I can explore all the exciting DApps and enjoy the benefits of low-fee transactions. Thanks for the step-by-step guide!
Adding the Polygon network to Metamask is a fantastic idea for anyone looking to dive deeper into the world of cryptocurrencies. Polygon opens up a world of opportunities with its DApps and fast transactions. This step-by-step guide makes the integration process seamless and easy. Excited to explore the Polygon network further!
I just added the Polygon network to my Metamask following this guide, and it was a breeze! Now I can easily access Polygon-based dapps and tokens. Highly recommend for those looking to explore new possibilities in the cryptocurrency space.
Is adding the Polygon network to Metamask a complex process? I’m interested in exploring new opportunities with Polygon but not sure how difficult it is to integrate it into Metamask. Can anyone share their experience?
Integrating the Polygon network into Metamask is actually quite straightforward. By following the step-by-step guide provided in the article, you can easily add Polygon to Metamask and start exploring the exciting opportunities it offers. Feel free to reach out if you encounter any difficulties during the process!
Adding Polygon to Metamask is a game-changer! I’ve been enjoying the low-fee transactions and fast confirmation times on Polygon-based dapps. This step-by-step guide makes it super easy to integrate Polygon into your wallet. Thanks for the detailed instructions!
How secure is it to add Polygon to Metamask? Are there any risks involved in integrating these networks?
Adding Polygon to Metamask is generally considered a secure process as long as you follow the correct steps. However, like with any network integration, there are always potential risks involved, so it’s crucial to ensure you verify the details and sources before proceeding. As long as you are cautious and follow best security practices, integrating Polygon with Metamask can provide you with access to new opportunities in the crypto space.
Adding a Polygon network to Metamask is a great way to enhance your crypto experience. With Polygon, you can explore a variety of DApps, benefit from low transaction fees, and enjoy quick confirmation times. Following this step-by-step guide makes it easy to integrate Polygon into your wallet seamlessly.
Adding Polygon to Metamask is a game-changer! Being able to access Polygon-based dapps and enjoy low-fee transactions is fantastic. Thanks for the step-by-step guide!
Adding Polygon to my Metamask was a breeze with this guide! Now I can explore all the exciting DApps and enjoy fast transactions on the Polygon network. Thanks for the detailed steps!
How secure is it to add the Polygon network to Metamask? Are there any risks involved in integrating it with my wallet?
Adding the Polygon network to Metamask is generally considered safe as long as you verify the RPC URL and other details are correct. As with any integration, there is always a minimal risk, but by following the official steps and ensuring the information is accurate, the process should be secure and beneficial for expanding your crypto capabilities.
Adding a Polygon network to Metamask is a great idea. With Polygon, users can easily explore a variety of decentralized applications (DApps) and benefit from low-fee transactions and quick confirmation times. Following this step-by-step guide to integrate Polygon with Metamask is highly recommended for those looking to enhance their cryptocurrency experience.
Adding Polygon to Metamask was super easy with this guide! I’m excited to explore the world of Polygon-based dapps and tokens. Thanks for the detailed steps!
Adding Polygon to Metamask is a fantastic way to broaden your crypto horizons! It opens up a world of DApps and ensures quick transactions with low fees. Following this guide, you can seamlessly integrate Polygon into your Metamask wallet.
Adding a Polygon network to Metamask is a fantastic idea for those looking to delve into the world of cryptocurrencies. By integrating Polygon, you open up a plethora of DApps and benefit from swift transactions with minimal fees. Following this step-by-step guide makes the process seamless, allowing you to effortlessly incorporate Polygon into your wallet.
Adding Polygon to Metamask is a game-changer! Seamlessly integrating it into my wallet opens up a world of possibilities with low fees and fast transactions. Excited to explore Polygon-based dapps and tokens now!
Adding a Polygon network to Metamask is a game-changer! With Polygon integrated, accessing DApps and enjoying low-fee transactions becomes effortless. This step-by-step guide makes the process smooth and user-friendly. Excited to explore the possibilities it offers!
Adding Polygon to Metamask is a fantastic way to broaden your cryptocurrency options. Polygon offers quick transactions and low fees, making it a valuable addition to any wallet. This step-by-step guide simplifies the process of integrating Polygon into your Metamask wallet, allowing you to explore a variety of DApps and tokens seamlessly.
Adding a Polygon network to Metamask is a fantastic idea! With Polygon, we can explore a variety of decentralized applications (DApps) and benefit from low-fee transactions and quick confirmation times. Following this easy guide to integrate Polygon into Metamask opens up new cryptocurrency opportunities.
Adding Polygon to Metamask was a breeze with this guide! Now I can easily access Polygon-based dapps and tokens. It’s great to have low-fee transactions and fast confirmation times on Polygon.
How do I ensure that adding the Polygon network to Metamask won’t affect the security of my wallet? Any risks involved?
Hi AlexCryptoEnthusiast, adding the Polygon network to Metamask is a safe process if you follow the steps correctly. When you add a custom network like Polygon, you’re not compromising the security of your wallet as long as you enter the correct details provided by Polygon’s official sources. Just be cautious about phishing attempts and make sure you’re using the official Polygon network details. Happy exploring!
Adding a Polygon network to Metamask opens up so many opportunities for exploring new decentralized applications (DApps) and enjoying fast confirmation times. It’s a fantastic way to broaden your cryptocurrency horizons and benefit from low-fee transactions. This guide makes the process seem really straightforward and user-friendly. Can’t wait to give it a try!
Adding Polygon to Metamask is a game-changer! With Polygon, you gain access to a wide array of DApps with low fees and fast confirmations. This guide simplifies the integration process, making it a seamless addition to your wallet.
Adding Polygon to Metamask is a game-changer for crypto enthusiasts. With Polygon, users gain access to a plethora of DApps and can enjoy lightning-fast transactions. Integrating Metamask with the Polygon network is a seamless process that opens up a world of new possibilities. Exciting times ahead for the crypto community!
Adding Polygon to Metamask opens up exciting opportunities in the world of cryptocurrency. I believe integrating Polygon as a supported network is crucial for accessing DApps and enjoying faster transactions. This guide simplifies the process and makes it accessible to all users.
How secure is it to connect my Metamask with the Polygon network? Any risks involved?
Hi Alice123, connecting your Metamask with the Polygon network is relatively secure if you follow proper guidelines. As with any network integration, there are risks involved, primarily related to phishing attacks and malicious contracts. However, by ensuring you are using the correct RPC URL and being cautious with your transactions, you can minimize these risks. Happy Polygon exploring!
Adding Polygon to Metamask is a fantastic way to enhance your crypto experience. Polygon offers a wide range of DApps with low fees and fast transactions. This guide makes integration seamless and opens new doors for exploration!
Adding the Polygon network to Metamask was a breeze with this step-by-step guide! I’m excited to explore the world of Polygon-based dapps and tokens with low-fee transactions and fast confirmation times. Thanks for the clear instructions!
Adding Polygon to Metamask opens up a whole new world of possibilities in the crypto space. Excited to explore DApps and benefit from low fees on the Polygon network!
Adding Polygon to Metamask was so easy with this guide! Now I can explore all the features of Polygon network seamlessly. Thanks for the step-by-step instructions!
Adding Polygon to Metamask opens up a whole new realm of possibilities! Integrating Polygon allows for seamless access to a variety of DApps with low fees and fast transactions. Follow these steps to level up your crypto experience!
I just added Polygon to my Metamask following this guide, and it was so easy! Now I can explore a whole new world of DApps on the Polygon network. The low fees and fast transactions are a game-changer for me. Highly recommend it!
Could you please explain the advantage of using the Polygon network with Metamask compared to other networks?
Sure, Emily! One of the main advantages of using the Polygon network with Metamask is the significantly lower transaction fees compared to Ethereum. Additionally, the speed of transactions is much faster, which is a big plus when interacting with various DApps. If you’re looking for a seamless experience that combines efficiency and cost-effectiveness, Polygon is definitely worth considering.
Adding a Polygon network to Metamask is a game-changer! Polygon provides access to a diverse range of DApps with low transaction fees and fast confirmations. This step-by-step guide makes it easy to integrate Polygon with Metamask for an enhanced crypto experience. Excited to explore the possibilities!
Adding Polygon to Metamask is a game-changer! Polygon opens up a whole new world of opportunities for decentralized applications and swift transactions. Excited to dive into the Polygon ecosystem!
I recently added the Polygon network to my Metamask wallet, and I have to say, the process was super straightforward! The low transaction fees and fast confirmations are a game changer for me. I can’t believe I didn’t do it sooner! If you’re hesitant, go for it—this guide made everything so easy to follow!
I’ve been using Metamask for a while, and adding the Polygon network was a game changer! The low fees and quick transactions have made a huge difference in my trading. This guide made the process super easy to follow. Highly recommend trying it out!
Thanks for the guide! I’m curious, can I use Polygon on Metamask for transactions directly without needing to switch networks every time?
You’re welcome, AlexRider93! Yes, once you add the Polygon network to your Metamask, you can use it for transactions directly without needing to switch networks constantly. Just make sure to keep your network set to Polygon when you’re engaging with dApps or making transactions on that network!
I’ve just added the Polygon network to my Metamask wallet, and I can’t believe how easy it was! The step-by-step guide made the process smooth and straightforward. Now I’m excited to explore all the dApps available on Polygon. Anyone else thinking about making the switch?
Absolutely, JasonCoder89! Adding the Polygon network to Metamask was a breeze for me too. I loved how clear the instructions were. I’m looking forward to diving into the low fees and fast transactions. It really opens up a whole new world of possibilities for us. Have you discovered any dApps that you enjoy?
Thanks for sharing your experience, SarahTechie22! I completely agree. The instructions made it so simple to get started. I’ve already started exploring some dApps, and I’m really excited about the potential of lower fees. I’ve tried out a couple of games on Polygon – they’re really fun! Have you tried any specific dApps yet?
Thanks for sharing, CryptoNerd89! I also found the process straightforward. I’ve added Polygon to my wallet and can’t believe how quickly I can access various dApps. I recently tried out a DeFi platform, and the experience was fantastic. What games have you played on Polygon? I’m curious to explore more!
You’re welcome, BlockChaser99! I’m glad to hear you found it easy too. I’ve also been diving into several games on Polygon, and they’re really fun! I tried out Aavegotchi and can’t get enough of it. If you’re into RPGs, definitely check out the Lost Relics! What has been your favorite dApp so far?
I’ve recently added the Polygon network to my Metamask, and I must say, it’s been a game-changer! The low fees and quick transactions really enhance my experience with DApps. This guide made the process so easy to follow. Highly recommend it to anyone looking to explore the Polygon ecosystem!
I just added the Polygon network to my Metamask, and it was so straightforward! The step-by-step guide made everything easy to follow. I’m really excited about the low fees and fast transactions. This is definitely a game changer for accessing DApps!
I’ve just added the Polygon network to my Metamask wallet following this guide, and it was super easy! The low fees and speed of transactions are a game changer. I’m excited to explore the DApps available on Polygon now!
Adding the Polygon network to Metamask is such a game changer! I recently did this and the low fees and fast transactions have really improved my DeFi experience. This step-by-step guide was super helpful and made the process easy to understand. I couldn’t be happier!
I’m really excited to add Polygon to my Metamask! Could you clarify if there are any specific dapps that work best with the Polygon network?
Hey Jessica! I’m glad you’re excited about adding Polygon to Metamask. There are several dapps that work great with the Polygon network, such as Aave, QuickSwap, and SushiSwap. These platforms offer low transaction fees and efficient interactions. Happy exploring!
Great guide! I followed the steps but I’m getting an error when trying to connect to the Polygon network. Has anyone else faced this issue?
Hi EmilyCoder89! I faced a similar issue at first. Make sure that you have entered the RPC URL and Chain ID correctly. Sometimes a simple typo can cause connection problems. If everything looks good, try refreshing your Metamask extension or restarting your browser. Hope this helps!
I’m really interested in adding the Polygon network to my Metamask, but could you clarify if there are any potential risks involved in using the Custom RPC feature?
Hi Jenna_CryptoGuru, it’s great that you’re exploring adding Polygon! While using the Custom RPC feature is generally safe, always double-check the URLs you enter for any phishing risks. Additionally, remember that any network could potentially experience issues, so it’s wise to keep some funds in a separate wallet as a precaution. Happy exploring!
I recently added the Polygon network to my Metamask, and it was super easy! The step-by-step guide was clear and straightforward. I’m really excited about the low transaction fees and the speed of the network. Anyone who’s keen on exploring new DApps should definitely consider this addition. Highly recommend it!
I’ve just added the Polygon network to my Metamask, and I can’t believe how easy the process was! This guide was super helpful. Low fees and fast transactions are a game changer for my crypto activities. I’m definitely exploring more dapps now!
I just added the Polygon network to my Metamask, and I couldn’t be happier! The step-by-step guide made it so easy to follow. I love the low fees and speedy transactions. This really opens up new opportunities for exploring DApps. Highly recommend it to anyone looking to expand their crypto experience!