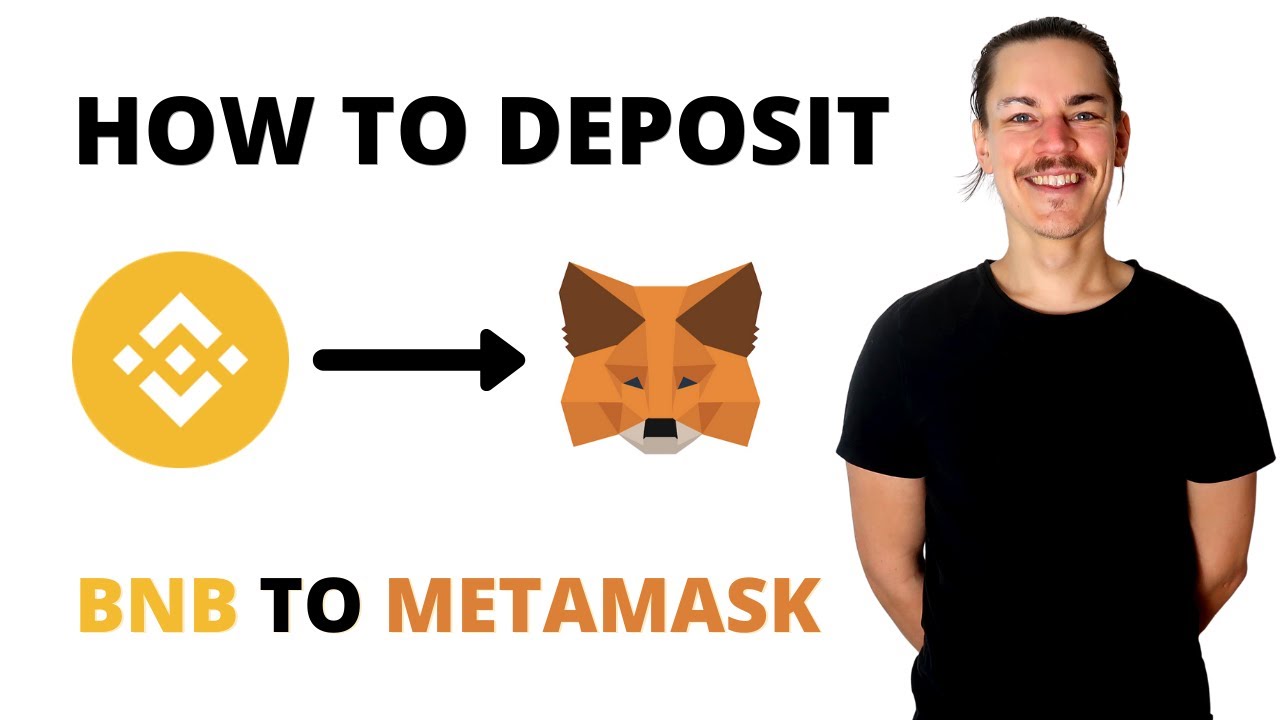
Sending BNB to your Metamask wallet is a simple process that allows you to transfer your BNB tokens onto the Metamask platform, where you can manage and use your funds. By following a few easy steps, you can easily send BNB to Metamask and start taking advantage of its features.
Step 1: Set Up Metamask
To send BNB to Metamask, you first need to have a Metamask wallet set up. If you haven’t already done so, download the Metamask extension for your web browser and create a new wallet. Remember to securely store your seed phrase as it will be needed to access your wallet in the future.
Step 2: Get Your BNB Address
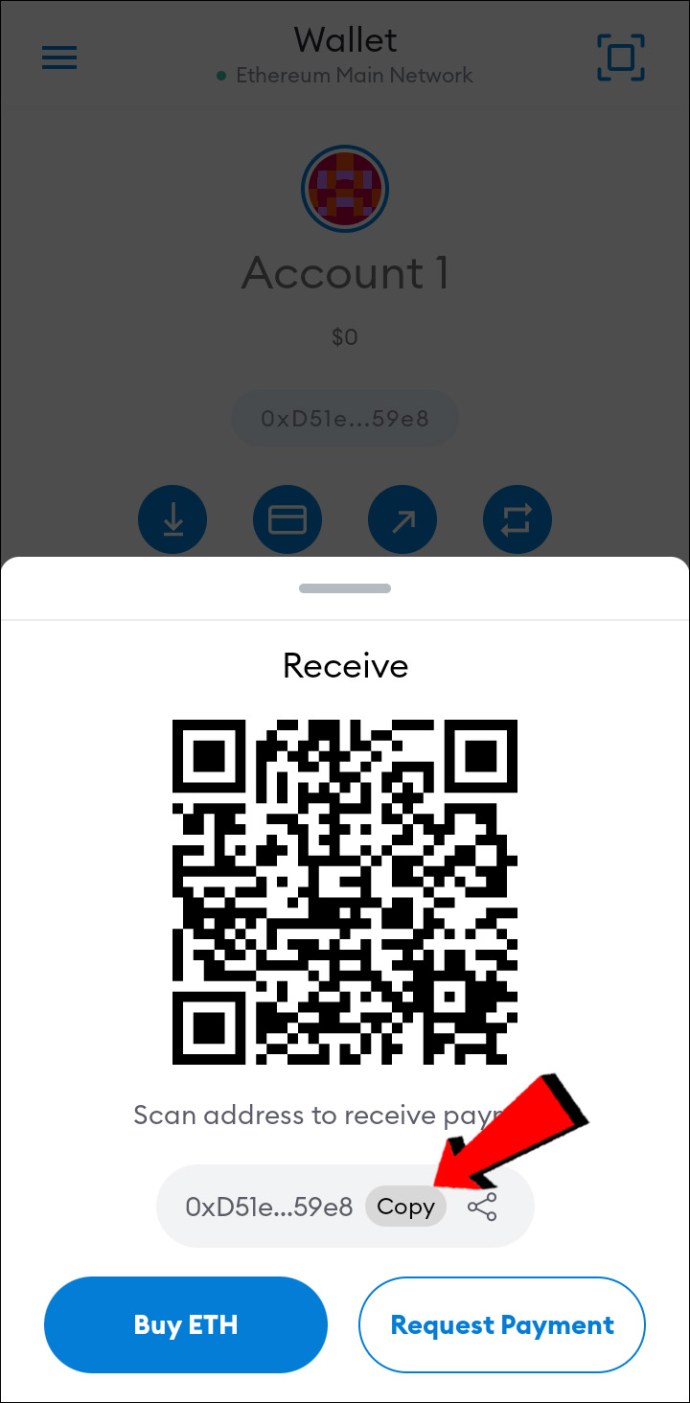
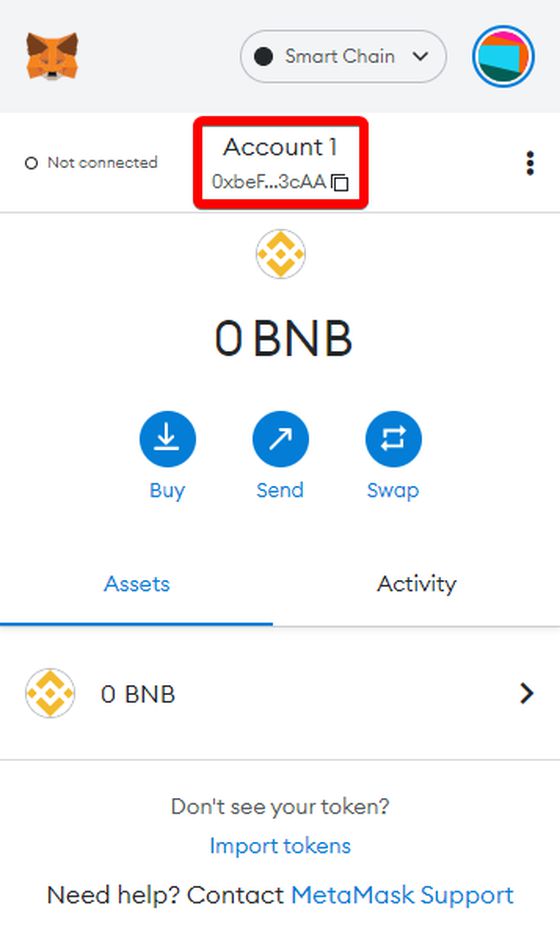
Once your Metamask wallet is set up, you will need to find your BNB address. Open the Metamask extension and click on the account icon. From the drop-down menu, select “Copy Address” to copy your BNB address to your clipboard.
Step 3: Initiate the BNB Transfer
Now that you have your BNB address, go to the wallet or exchange where your BNB tokens are currently located. Find the option to send or transfer BNB, and paste your Metamask BNB address in the recipient field.
Step 4: Confirm the Transfer
Double-check that you have entered the correct BNB address in the recipient field, as transactions on the blockchain are irreversible. Once you have confirmed the address, proceed to confirm the transfer and follow any additional steps required by the wallet or exchange.
Step 5: Wait for Confirmation
After initiating the transfer, you will need to wait for the transaction to be confirmed on the blockchain. This process can take a few minutes or longer, depending on the network congestion. Keep an eye on your Metamask wallet for the BNB tokens to appear in your balance.
Congratulations! You have successfully sent BNB to your Metamask wallet. Now you can use your BNB tokens on the Metamask platform for various purposes, including participating in decentralized finance (DeFi) protocols, trading on decentralized exchanges (DEXs), and much more.
Setting Up Metamask for BNB Transactions
If you want to send BNB (Binance Coin) to your Metamask wallet, you will need to set it up correctly. Follow these steps to ensure you can seamlessly transfer BNB to Metamask:
- Install Metamask: Start by installing the Metamask extension on your preferred web browser. You can find the extension in the Chrome Web Store or the Firefox Add-ons marketplace. Once installed, create a new wallet or import an existing one.
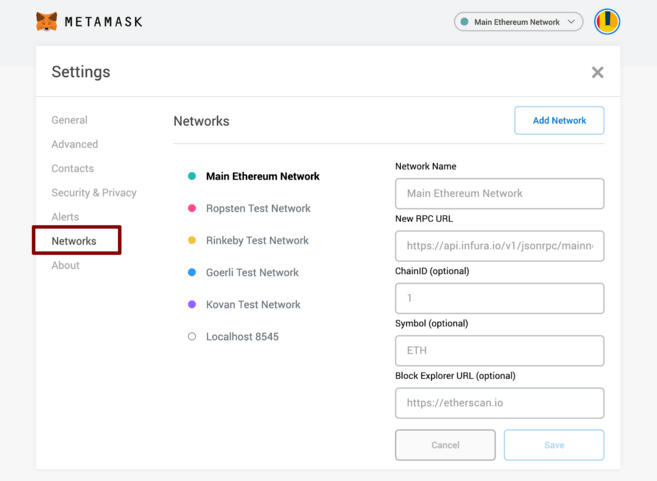
- Add Binance Smart Chain Network: Once your Metamask wallet is set up, you need to add the Binance Smart Chain network. Click on the network selection dropdown and select “Custom RPC” to manually add a network. Enter the following details:
- Network Name: Binance Smart Chain
- New RPC URL: https://bsc-dataseed.binance.org/
- ChainID: 56
- Symbol: BNB
- Block Explorer URL: https://bscscan.com/
Click “Save” to add the Binance Smart Chain network to Metamask.
- Obtain BNB Address: To receive BNB in your Metamask wallet, you will need to obtain your BNB address. In the Metamask extension, click on the account icon and select “Copy Address” to copy your BNB address to the clipboard.
- Send BNB from Binance: Go to your Binance account or any other platform where you hold BNB. Initiate a withdrawal or transfer action, and paste your BNB address from Metamask as the recipient address. Double-check that the address is correct before confirming the transaction.
- Confirm Transfer: Once you have completed the withdrawal or transfer on the Binance platform, wait for the transaction to be confirmed. You can track the progress by searching for the transaction hash on the Binance Smart Chain block explorer.
- Check Metamask Balance: After the transaction is confirmed, you should see the transferred BNB in your Metamask wallet. To view your BNB balance, click on the account icon in the Metamask extension and select your BNB account.
Congratulations! You have successfully set up Metamask for BNB transactions and completed a BNB transfer. You can now use your BNB within the Metamask ecosystem or send it to other addresses as needed.
Creating a Wallet on Metamask
To send BNB to Metamask, you first need to have a wallet on the Metamask platform. Follow these steps to create a wallet on Metamask:
- Go to the Metamask website and click on the “Get Chrome Extension” button to download and install the Metamask extension for your web browser.
- Once the extension is installed, click on the Metamask icon in your browser’s toolbar to open the extension.
- Click on the “Create a Wallet” button to start the wallet creation process.
- Enter a strong password for your wallet and click on the “Create” button.
- You will be presented with a set of backup phrases. It is important to save these phrases in a safe place as they can be used to restore your wallet if needed.
- Confirm that you have saved the backup phrases by clicking on them in the correct order.
- Your wallet is now created and ready to use on Metamask.
Once you have created a wallet on Metamask, you can proceed to transfer BNB to it following the steps outlined in the guide for “How to Send BNB to Metamask”.
Obtaining BNB for Transfer
To send BNB to your Metamask wallet, you will first need to obtain BNB from a compatible exchange. Here are the steps to follow:
- Choose a compatible exchange: Not all exchanges support BNB transfers. Make sure to choose an exchange that allows you to send BNB to external wallets.
- Create an account: Sign up for an account on the chosen exchange and complete the necessary verification process.
- Deposit funds: Once your account is set up, deposit funds into your exchange wallet. Most exchanges offer multiple deposit options such as bank transfer, credit card, or cryptocurrency deposit.
- Buy BNB: After depositing funds, navigate to the trading section of the exchange and find the BNB trading pair. Buy the desired amount of BNB using your deposited funds.
- Withdraw BNB: Once you have successfully purchased BNB, locate the withdrawal option on the exchange. Enter your Metamask wallet address as the destination and specify the amount of BNB you want to transfer.
- Confirm the withdrawal: Review the withdrawal details carefully and confirm the transaction. The exchange may require you to verify the withdrawal via email or two-factor authentication.
After following these steps, the BNB should be sent to your Metamask wallet and you will be able to use it to participate in various decentralized finance (DeFi) activities or perform other actions within the Ethereum ecosystem.
Adding BNB to Metamask Wallet
Metamask is a popular cryptocurrency wallet that allows users to manage their digital assets and interact with decentralized applications (dApps) on the Ethereum network. If you are looking to add BNB (Binance Coin) to your Metamask wallet, follow the step-by-step guide below:
- Ensure that you have the latest version of Metamask installed on your browser. If not, download it from the official Metamask website and set up your wallet.
- Transfer or send BNB from your Binance account to your Metamask wallet address. You can do this by following the steps provided on the Binance platform for withdrawing BNB.
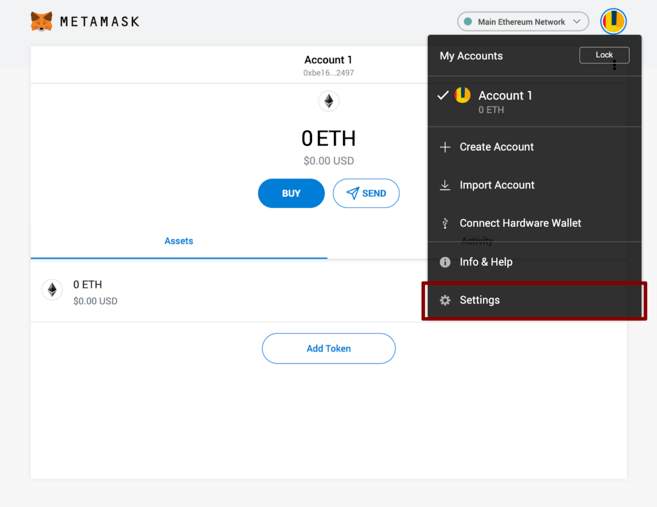
- Once the BNB has been sent to your Metamask wallet, open the Metamask extension on your browser.
- Click on the account icon at the top right corner of the Metamask extension and select “Copy” to copy your wallet address.
- Visit the Binance Smart Chain (BSC) explorer website and paste your Metamask wallet address in the search bar.
- Verify that your BNB balance is reflected correctly in your Metamask wallet.
- To view your BNB balance in the Metamask wallet, click on the account icon in the extension and select your wallet account.
- You can now use your BNB in the Metamask wallet to interact with various dApps or transfer it to other addresses.
Following these steps will ensure that you successfully add BNB to your Metamask wallet and can start using it for various purposes such as participating in token sales, decentralized exchanges, and other DeFi activities on the Binance Smart Chain. Always double-check the wallet address before sending any funds to avoid any potential loss of funds.
Connecting Metamask to a Supported Blockchain Network
Before you can send BNB to Metamask, you need to connect your Metamask wallet to a supported blockchain network. Metamask supports multiple blockchain networks, including Ethereum, Binance Smart Chain (BSC), and others.
Step 1: Install Metamask Extension
If you haven’t already, install the Metamask browser extension. Metamask is available for popular web browsers like Chrome, Firefox, and Brave. Visit the Metamask website or search for “Metamask” in your browser’s extension store to install it.
Step 2: Create a New Wallet or Import an Existing Wallet
Once the Metamask extension is installed, open it and follow the prompts to set up your wallet. You can either create a new wallet or import an existing one using a seed phrase or private key.
Step 3: Set Up a Supported Blockchain Network
To connect Metamask to a supported blockchain network, follow these steps:
- Click on the Metamask extension icon in your browser toolbar.
- Click on the network selection dropdown (it will display the current network).
- Scroll down and select the desired blockchain network, such as Binance Smart Chain (BSC).
- Click “Switch” to change the network in Metamask.
Step 4: Configure Network Parameters
After switching to the desired blockchain network, you may need to configure some network parameters. For example, if you select Binance Smart Chain (BSC), you need to ensure that the RPC URL is set to the correct BSC endpoint. Refer to the network’s documentation for the specific configuration details.
Step 5: Test the Connection
To verify that you have successfully connected Metamask to the chosen blockchain network, visit a blockchain explorer for that network, such as BscScan for Binance Smart Chain. Enter your wallet address in the search bar, and if it shows your transaction history and balance correctly, then your connection is working.
Step 6: Start Sending BNB to Metamask
Once you have successfully connected Metamask to the desired blockchain network, you are ready to send BNB to your Metamask wallet. Follow the steps outlined in the “How to Send BNB to Metamask: A Step-By-Step Guide” to transfer BNB to your Metamask wallet.
By following these steps, you can connect Metamask to a supported blockchain network, such as Binance Smart Chain, and start using your BNB tokens within the Metamask wallet.
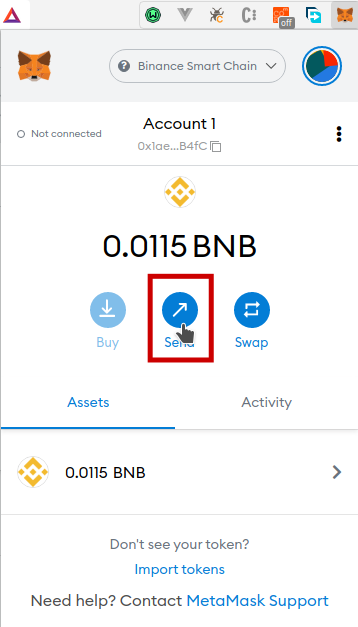
Initiating a BNB Transfer in Metamask
Once you have BNB in your Metamask wallet, you can easily send it to another wallet or platform by following these steps:
- Open the Metamask extension or app.
- Make sure you are on the correct network (Binance Smart Chain).
- Click on the “Send” button.
- Enter the recipient’s wallet address in the “Recipient” field.
- Specify the amount of BNB you want to send in the “Amount” field.
- Double-check the recipient’s wallet address and the amount of BNB you entered.
- Click on the “Next” button to proceed with the transfer.
- Review the transaction details and gas fee.
- If everything looks correct, click on the “Confirm” button to send the BNB.
- Wait for the transaction to be confirmed on the blockchain.
- The BNB will be successfully transferred to the recipient’s wallet.
Following these steps will guide you on how to send BNB from your Metamask wallet to another wallet or platform. Make sure to double-check all the details before confirming the transfer.
Confirming the BNB Transfer Transaction
Once you have completed the steps outlined in the previous sections of this guide, you are ready to confirm the BNB transfer transaction in Metamask.
- Open the Metamask extension in your browser.
- Make sure you are on the “Transfer” tab.
- Double-check the recipient address to ensure it is correct.
- Enter the amount of BNB you want to send in the designated field.
- Select the appropriate network for the transfer (Ethereum Mainnet, Binance Smart Chain, etc.).
- Review the transaction details, including the gas fees and estimated completion time.
- If everything looks correct, click on the “Confirm” button to proceed with the transfer.
- Metamask will prompt you to review and confirm the transaction once again.
- Review the details once more and ensure everything is accurate.
- If you are satisfied, click on the “Confirm” button again to finalize the transfer.
Once the transaction is confirmed, Metamask will submit it to the blockchain for processing. You can monitor the progress of the transfer in your Metamask transaction history.
It is important to note that the transaction may take some time to be included in a block and confirmed on the blockchain. The duration of the transfer will depend on network congestion and the gas fees you have selected.
After the transfer is complete, you will see the updated BNB balance in your Metamask wallet. You can also verify the transaction on a blockchain explorer by searching for the transaction hash.
Troubleshooting
If you encounter any issues during the transfer process, ensure that:
- You have sufficient BNB balance in your Metamask wallet to cover the transfer amount and gas fees.
- You are connected to the correct network in Metamask.
- The recipient address is accurate and belongs to the intended recipient.
- You have approved any necessary token allowances if you are sending a token other than BNB.
- Your Metamask extension is up to date.
If you are still experiencing problems, you may need to seek further assistance from the Metamask support team or consult their documentation.
Verifying the BNB Transfer in Metamask
After completing the steps outlined in the guide on how to send BNB to Metamask, you will need to verify the transfer in your Metamask wallet. Here are the steps to verify the BNB transfer:
- Open your Metamask wallet extension or mobile app.
- Make sure you are on the correct network. In this guide, we assume you are using the Binance Smart Chain (BSC) network.
- Click on the Metamask extension or app icon to open the wallet.
- Once your wallet is open, you should see your account balance. If it displays the correct balance of BNB, then the transfer was successful.
- If you do not see the correct balance reflected, you can try refreshing your wallet or checking the transaction history.
- To view your transaction history, click on the “Transactions” tab in the Metamask wallet.
- Look for the transaction corresponding to the BNB transfer you just made. It should show the transaction details, including the amount sent and the recipient address.
- If the transaction details match your BNB transfer, then you can be confident that the transfer was successful.
Verifying the BNB transfer in Metamask is an important step to ensure that your funds have been successfully sent and received. By following these steps, you can confirm that your BNB transfer was completed without any issues.
Troubleshooting BNB Transfer Issues in Metamask
If you are experiencing issues with sending BNB to Metamask, there are a few steps you can follow to troubleshoot the problem. Here is a guide on how to troubleshoot BNB transfer issues in Metamask:
1. Double-check your steps
Before proceeding with any troubleshooting steps, make sure you followed the correct steps for sending BNB to your Metamask wallet. Review the guide or instructions you were following and ensure that you didn’t miss any important details or steps.
2. Confirm the recipient address
Verify that you have entered the correct recipient address in the transaction. One small mistake in the address can result in sending the BNB to the wrong wallet. Double-check the address and compare it with the intended recipient’s address.
3. Check the network settings
Make sure you are connected to the correct network in your Metamask wallet. By default, it should be set to the Binance Smart Chain network for BNB transfers. If you are connected to a different network, change it to the appropriate one.
4. Ensure you have enough BNB for the transfer
Verify that you have enough BNB in your Metamask wallet to cover the transfer amount, as well as any associated gas fees. If you don’t have sufficient funds, you won’t be able to complete the transaction. Consider adding more BNB to your wallet if necessary.
5. Check for transaction errors or failures
If the transaction still fails or encounters an error, check the transaction details for any error messages or failure notifications. These can provide more specific information about why the transfer is not going through. You may need to consult with Metamask support or the respective support channels for further assistance.
6. Contact Metamask support

If you have followed all the troubleshooting steps and are still unable to send BNB to your Metamask wallet, it might be necessary to reach out to Metamask support for further assistance. Explain the issue you are facing in detail and provide any relevant transaction details or error messages for better support.
By following these troubleshooting steps, you should be able to identify and resolve any issues you are encountering with sending BNB to your Metamask wallet. Remember to always take caution when conducting transactions and double-check all details to avoid any possible mistakes or losses.
Best Practices for Transferring BNB to Metamask
When it comes to transferring BNB to Metamask, following a few best practices can help ensure a smooth and secure process. Here are some steps to consider:
- Ensure Sufficient Funds: Before initiating the transfer, make sure you have enough BNB in your wallet to cover the transaction fees.
- Verify Metamask Address: Double-check the Metamask wallet address you are sending the BNB to. It’s crucial to avoid any typos or mistakes that could result in the loss of your funds.
- Choose the Right Network: Metamask supports multiple networks, including the Ethereum mainnet and various testnets. Make sure you select the correct network that matches the BNB you are transferring.
- Use a Secure Connection: When sending BNB to Metamask, ensure that you are using a secure and trusted connection. Avoid using public or unsecured Wi-Fi networks to reduce the risk of hacking or interception.
- Set Appropriate Gas Fees: Gas fees are required to process transactions on the blockchain. Ensure that you set an appropriate gas fee to ensure your transaction gets processed in a timely manner. Low gas fees may result in delays or transaction failures.
Following these best practices can help minimize the risk of errors or security issues when sending BNB to your Metamask wallet. Always exercise caution and double-check all details before initiating any transaction.
Frequently asked questions:
What is Metamask?
Metamask is a browser extension and mobile app that serves as a cryptocurrency wallet and allows users to manage and interact with decentralized applications (DApps) on the Ethereum network. It provides a user-friendly interface and allows users to store, send, receive, and manage their Ethereum-based assets, such as BNB (Binance Coin), ERC-20 tokens, and NFTs (Non-Fungible Tokens). Metamask also allows users to connect to different Ethereum networks, like the Ethereum mainnet, testnets, and custom networks.
Is it safe to send BNB to Metamask?
Making transactions with Metamask is generally considered safe. Metamask implements various security measures, such as encryption and private key management, to protect users’ funds. However, it’s important to ensure that you are using the official and legitimate version of the Metamask extension or mobile app, as there have been cases of phishing attempts and fake Metamask applications that aim to steal users’ funds. Always double-check the website or source from which you download Metamask, and be cautious of any suspicious requests for your private keys or passwords.
Are there any transaction fees for sending BNB to Metamask?
Yes, there are transaction fees associated with sending BNB to Metamask. These fees are typically paid to miners who validate and process the transactions on the blockchain. The exact amount of the transaction fee can vary depending on network congestion and the gas price set for the transaction. It’s important to be aware of the current gas prices and adjust your fee accordingly to ensure timely confirmation of your transaction.
How long does it take to send BNB to Metamask?
The time it takes to send BNB to Metamask can vary depending on network congestion and the speed of the chosen blockchain. Typically, BNB transactions are relatively fast, and it can take anywhere from a few seconds to a few minutes for the transaction to be confirmed on the blockchain. However, during periods of high network activity, it may take longer for the transaction to be processed. You can usually track the progress of your transaction using blockchain explorers or within the Metamask interface.
Videos:
How To Withdraw Metamask Crypto Into Your Bank Or Paypal Account – Quick and Easy!
How to Send BNB To Metamask | Simple Step-by-Step Tutorial
Thanks for sharing this guide! I was looking for an easy way to send my BNB to my MetaMask wallet. This step-by-step process makes it so much simpler to understand. Can’t wait to start using MetaMask!
I followed this guide step by step and it worked perfectly! Sending BNB to Metamask was a breeze. Thanks for the clear instructions!
I followed this guide and successfully sent my BNB to MetaMask. It was a simple and straightforward process. Thank you for the clear instructions!
This guide was very helpful! I followed the steps and successfully sent my BNB to MetaMask. Thank you!
This guide is very helpful! I followed the steps and successfully sent my BNB to my MetaMask wallet. Thank you for the clear instructions!
Thanks for the detailed guide! I followed the steps and successfully sent my BNB to my MetaMask wallet. It was a smooth and simple process, and now I can easily manage and use my funds. Highly recommend this guide to anyone looking to transfer their BNB tokens.
Thanks for the step-by-step guide! I was able to send my BNB to my MetaMask wallet without any issues. It’s great to have all my funds in one place. Keep up the good work!
This guide was really helpful! I followed the steps and successfully sent my BNB to my MetaMask wallet. Now I can easily manage my funds and take advantage of MetaMask’s features. Thank you!
This guide is very helpful! I followed the steps and successfully sent my BNB to my MetaMask wallet. Now I can easily manage and use my funds. Thank you for sharing!
I found this guide extremely helpful! Sending BNB to MetaMask seemed like a daunting task, but the step-by-step instructions made it so easy. Now I can securely manage my funds on MetaMask. Thank you!
Sending BNB to my Metamask wallet was really easy! The step-by-step guide was clear and concise, making the process a breeze. Now I can manage and use my BNB tokens conveniently. Thanks for the helpful article!
Can I send BNB from my hardware wallet to Metamask?
Yes, you can send BNB from your hardware wallet to Metamask. The process is similar to transferring BNB from a wallet or exchange. You just need to follow the steps mentioned in the article to initiate the transfer and paste your Metamask BNB address as the recipient. Make sure to double-check the address before confirming the transfer. Happy trading!
This guide is so useful! I followed the steps and successfully sent my BNB to Metamask. Thank you for the clear instructions!
This guide was very helpful! I followed the steps and was able to send my BNB to Metamask smoothly. Now I can easily manage my funds on the platform. Thanks for sharing!
Thanks for the guide! I’ve been wanting to send my BNB to Metamask for a while now, and this step-by-step process makes it easy to understand. Can’t wait to start using my funds on the Metamask platform!
This guide is really helpful! I followed the steps and successfully sent my BNB to MetaMask. Now I can easily manage my funds. Thanks for sharing!
Is it necessary to have a Metamask wallet to send BNB to Metamask, or can I use any other wallet?
Yes, Alice. In order to send BNB to Metamask, you need to have a Metamask wallet. It is specifically designed to work with the Metamask platform and allows for seamless integration and management of BNB tokens.
I found this guide to be very helpful in sending BNB to my MetaMask wallet. The step-by-step instructions were clear and easy to follow. Thanks for sharing!
This guide is very helpful! I managed to send my BNB to MetaMask without any issues. It was a simple process, and now I can easily manage my funds on MetaMask. Thanks for the detailed steps!
I followed this guide step by step and successfully sent my BNB to my MetaMask wallet. The process was easy and straightforward. Thank you for providing such a comprehensive guide!
This guide is very helpful! I recently started using MetaMask and was looking for a clear step-by-step process on how to send BNB to my wallet. Thanks for sharing!
Can I use this guide to send BNB from my Binance account to my Metamask wallet?
Yes, Sam_W, you can definitely use this guide to send BNB from your Binance account to your Metamask wallet. Just follow the step-by-step instructions mentioned in the article, and you’ll be able to transfer your BNB tokens easily. If you have any specific questions or need further assistance, feel free to ask.
This guide is very helpful! I followed the steps and successfully sent my BNB to my MetaMask wallet. It’s so convenient to have all my funds in one place. Thank you for the detailed instructions!
Is it possible to send BNB from a mobile wallet to MetaMask using the same steps?
Yes, you can send BNB from a mobile wallet to MetaMask using the same steps. Simply follow the steps mentioned in the article to set up MetaMask on your mobile device and then proceed with transferring BNB to your MetaMask wallet. It’s a straightforward process that allows you to access and manage your BNB tokens on MetaMask seamlessly.
Can I use this guide to send other cryptocurrencies to my Metamask wallet, or is it only for BNB?
Hi Samantha, this guide specifically focuses on sending BNB to Metamask. However, the process of sending other cryptocurrencies to your Metamask wallet is very similar. The main difference would be obtaining the address for the specific cryptocurrency you want to send. You can follow the same steps mentioned in this guide, but instead of finding your BNB address, you would need to find the address for the desired cryptocurrency. Let me know if you have any more questions!
This guide is really helpful! I followed the steps and successfully sent my BNB to my MetaMask wallet. Now I can easily manage and use my funds. Thank you!
Can I use this guide to send BNB from my Binance account to MetaMask?
Yes, MarkJohnson92, you can definitely use this guide to send BNB from your Binance account to MetaMask. Just follow the step-by-step instructions provided in the article, and you’ll be able to transfer your BNB tokens to MetaMask in no time. Happy sending!
Wow, this guide is so helpful! I had no idea how to send BNB to Metamask, but now I feel confident to do it myself. Thank you for the step-by-step instructions!
Great guide! I followed these steps and successfully sent my BNB to Metamask. It was very easy to understand and execute. Thanks for sharing!
This guide was really helpful! I followed all the steps and successfully sent my BNB to my Metamask wallet. Now I can easily manage my funds. Thank you!
This guide was very helpful! I followed the steps and successfully sent my BNB to my MetaMask wallet. Now I can easily manage and use my funds. Thank you!
Thanks for the detailed guide! Sending BNB to MetaMask was a breeze following your instructions. Now I can easily manage and use my funds on the platform without any hassle. Great job!
I found this guide very helpful in sending BNB to my MetaMask wallet. The step-by-step instructions were easy to follow and I was able to successfully transfer my BNB tokens. Thank you!
Is it possible to send BNB from a hardware wallet to MetaMask?
Yes, it is possible to send BNB from a hardware wallet to MetaMask.
To do so, you will need to follow similar steps as mentioned in the article.
Set up MetaMask on your web browser and get your BNB address.
Then, initiate the BNB transfer from your hardware wallet and paste your MetaMask BNB address as the recipient.
Just make sure to double-check the address to avoid any errors. Happy transferring!
I found this guide very helpful! Setting up Metamask and transferring my BNB tokens was a breeze. Now I can easily manage my funds. Thank you!
This guide is very helpful! I followed the steps and successfully sent my BNB to Metamask. Now I can easily manage my funds. Thanks for sharing!
Could you please clarify if the guide works for both the desktop and mobile versions of MetaMask?
Yes, the guide works for both the desktop and mobile versions of MetaMask. You can follow the same steps mentioned in the guide to send BNB to your MetaMask wallet, whether you are using the desktop or mobile version of the platform.
Great article! Sending BNB to Metamask couldn’t be easier with this step-by-step guide. I followed the instructions and successfully transferred my BNB tokens to my Metamask wallet. Now I can easily manage and access my funds. Thanks!
Is there a fee for sending BNB to Metamask?
Yes, there is a fee for sending BNB to Metamask. When you initiate the transfer, a transaction fee will be deducted from your BNB balance. The exact amount of the fee may vary depending on the current network congestion and gas prices. Make sure to have enough BNB in your wallet to cover the fee. Happy sending!
I just followed this guide and successfully sent my BNB to my MetaMask wallet. It was a straightforward process, and I appreciate the step-by-step instructions. Now I can easily manage my funds on MetaMask. Thank you!
Can I use this guide to send BNB from my mobile wallet to MetaMask?
Yes, you can definitely use this guide to send BNB from your mobile wallet to MetaMask. The steps mentioned in the article are applicable regardless of whether you are using a web browser or a mobile device. Just make sure to have the MetaMask extension installed on your mobile browser and follow the instructions to send your BNB tokens. Happy transferring!
This guide was very helpful! I followed the steps and successfully sent my BNB to MetaMask. Now I can easily manage and use my funds. Thanks!
This guide was very helpful in explaining the step-by-step process of sending BNB to MetaMask. I followed the instructions and successfully transferred my BNB tokens. Thank you!
This guide is very helpful! I followed the steps and successfully sent my BNB to Metamask. Thank you for providing such clear instructions!
Thanks for the step-by-step guide! I followed the instructions and successfully sent my BNB to MetaMask. It was a seamless process and now I can easily manage my funds. Great job!
Is it possible to send BNB from a mobile wallet to Metamask? I currently have my BNB tokens on Trust Wallet and would like to transfer them to Metamask for easier management.
Yes, it is possible to send BNB from a mobile wallet to Metamask. Here’s how you can do it:
1. Open your Trust Wallet and find the option to send or transfer BNB.
2. Enter your Metamask BNB address in the recipient field.
3. Double-check that the address is correct and confirm the transfer.
Your BNB tokens will then be transferred to your Metamask wallet for easier management.
Let me know if you have any further questions!
This guide is really helpful! I’m new to using MetaMask, and this step-by-step process makes it so much easier for me to send BNB to my wallet. Thanks for sharing!
This guide was really helpful! I successfully sent my BNB to Metamask following these easy steps. Thank you for providing such a clear and concise explanation.
Can I send BNB from my hardware wallet to Metamask? I want to make sure it’s possible.
Yes, you can send BNB from your hardware wallet to Metamask. It’s a simple process. You just need to follow the steps mentioned in the article to set up Metamask and get your BNB address. Once you have your BNB address, you can initiate the BNB transfer from your hardware wallet by pasting the Metamask BNB address as the recipient. Remember to double-check the address before confirming the transfer. Happy transacting!
Great guide! Sending BNB to Metamask was a breeze following these steps. Now I can easily manage my funds on the platform. Thanks!
This guide is really helpful! I followed the steps and successfully sent my BNB to my MetaMask wallet. Thank you for providing such a detailed guide!
Sending BNB to your Metamask wallet is a straightforward process that enables you to transfer your BNB tokens to the Metamask platform, where you can manage and utilize your funds. By following a few simple steps, you can effortlessly send BNB to Metamask and begin utilizing its functionalities.
Is it necessary to have any Binance account to send BNB to Metamask?
Hi Emily89, you don’t need a Binance account to send BNB to Metamask. You can simply follow the steps outlined in the article to transfer your BNB tokens to your Metamask wallet. Setting up Metamask and getting your BNB address are the key requirements for the process. Hope this helps!
Sending BNB to your Metamask wallet is really straightforward and secure. I’ve followed these steps myself and had no issues transferring my BNB tokens. Thanks for the clear guide!
Is it safe to transfer large amounts of BNB to Metamask following these steps?
As long as you securely store your seed phrase and double-check the recipient address before confirming the transfer, sending large amounts of BNB to your Metamask wallet is safe. Just make sure to follow the steps carefully for a smooth transfer process.
Sending BNB to my Metamask wallet was a breeze with this guide! I love how easy it is to manage my funds on the MetaMask platform. Highly recommend following these steps for a secure transfer.
Sending BNB to your Metamask wallet is a straightforward process that enables you to move your BNB tokens to the Metamask platform, where you can oversee and utilize your funds. By adhering to a few simple instructions, you can effortlessly transmit BNB to Metamask and commence leveraging its functionalities.
Sending BNB to my Metamask wallet was so easy following this guide! I appreciate the clear steps provided here. Now I can securely manage my BNB tokens on the Metamask platform without any hassle.
Thanks for the detailed guide on sending BNB to Metamask! I found it very helpful and easy to follow. Having all the steps laid out like this makes the process much more straightforward for beginners like me. Can’t wait to start using my BNB tokens on Metamask now!
Transferring BNB to Metamask was such a breeze with this guide! I followed the steps, set up my wallet, got my BNB address, and initiated the transfer seamlessly. This guide is definitely a must for anyone looking to manage their funds efficiently on Metamask.
Thanks for the detailed guide! Sending BNB to my Metamask wallet was a breeze following these instructions. Now I can easily manage my funds and take advantage of all the features Metamask offers.
Sending BNB to your MetaMask wallet is a straightforward process that allows you to transfer your BNB tokens to the MetaMask platform for easy management. Following a few simple steps, you can easily send BNB to MetaMask and begin utilizing its functionalities.
Sending BNB to your Metamask wallet is such a breeze! The step-by-step guide provided here makes it easy to transfer and manage your tokens. I followed these instructions and successfully sent my BNB to Metamask without any issues. Highly recommend!
Sending BNB to your Metamask wallet is a straightforward process that enables you to move your BNB tokens to the Metamask platform, where you can oversee and utilize your funds. By adhering to some simple steps, you can effortlessly transfer BNB to Metamask and begin leveraging its functionalities.
Thanks for the detailed guide on sending BNB to Metamask! I appreciate the step-by-step instructions provided. It’s always important to double-check the recipient address before confirming the transfer to avoid any errors.
Sending BNB to Metamask is such a breeze! The step-by-step guide makes it super easy to securely transfer my tokens and manage my funds on the platform. I particularly appreciate the emphasis on setting up Metamask and getting the BNB address right. Kudos to the team for simplifying the process!
Sending BNB to your MetaMask wallet is an essential action for cryptocurrency users. Managing your BNB tokens securely on the MetaMask platform opens up various opportunities for utilizing your funds efficiently. This step-by-step guide simplifies the process, ensuring a smooth and error-free transfer to your MetaMask wallet.
Sending BNB to my Metamask wallet was so easy by following this step-by-step guide. I appreciate the clear instructions provided here, making the process seamless and secure. Now, I can easily manage and use my BNB tokens on the MetaMask platform. Highly recommend it!
Sending BNB to my Metamask wallet was so easy with this guide! I love how straightforward the steps are and now I can manage my funds seamlessly on MetaMask. Setting up MetaMask was a breeze, and getting my BNB address was simple. Thank you for this helpful guide!
How secure is it to transfer BNB to MetaMask? Are there any risks involved in the process?
Transferring BNB to MetaMask is a safe process if you follow the recommended steps. As long as you securely store your seed phrase and verify the recipient address, the risks are minimal. It’s essential to double-check all details before confirming the transfer.
Sending BNB to my MetaMask wallet was so easy following this guide! I appreciate the step-by-step instructions provided here, especially setting up MetaMask and finding my BNB address. It’s great to have all my funds managed in one place now!
Is there a fee involved when sending BNB from an exchange to MetaMask?
Yes, there is usually a small fee associated with sending BNB from an exchange to MetaMask. Exchanges typically charge a network fee for processing the transfer on the blockchain. The fee amount can vary depending on the exchange you are using and network congestion. Make sure to check the fee schedule on the exchange platform before initiating the transfer to MetaMask.
Sending BNB to your Metamask wallet is such a breeze! I followed the steps outlined in this guide and was able to transfer my BNB tokens smoothly. Metamask is indeed a great platform for managing funds securely and efficiently.
Sending BNB to my Metamask wallet was a breeze with this guide! I followed the steps outlined here and successfully transferred my BNB tokens. Thank you for the clear instructions!
Sending BNB to your Metamask wallet is a straightforward process that allows you to transfer your BNB tokens to the Metamask platform, where you can manage and utilize your funds effectively. By following a few simple steps, you can effortlessly send BNB to Metamask and begin leveraging its features.
Thanks for the detailed guide! Sending BNB to Metamask was so easy following these steps. I appreciate the clear instructions provided here. Can’t wait to start using my BNB on Metamask!
Sending BNB to my Metamask wallet was a breeze after following this guide! I appreciate the clear steps provided here. Setting up Metamask and getting my BNB address was easy, and the transfer process was smooth. Thank you for simplifying the process!
Thanks for the detailed guide on sending BNB to MetaMask! It’s really helpful for newcomers to navigate the process smoothly and securely. I appreciate the step-by-step instructions provided here.
Can you explain more about the security measures in place when sending BNB to MetaMask? Is it safe to transfer large amounts?
Hey EmilySmith123, sending BNB to MetaMask is generally considered safe due to the encryption and security protocols in place. However, when transferring large amounts, it’s always a good idea to double-check the recipient address and ensure you are using secure networks to minimize any potential risks. MetaMask itself provides a secure environment for managing your tokens, but being cautious with large transfers is advisable. Hope this helps!
Thank you for the detailed guide on sending BNB to Metamask! It’s really helpful for someone like me who’s new to crypto. I followed the steps and successfully transferred my BNB tokens to Metamask without any issues. Can’t wait to explore the features and capabilities of the Metamask platform!
Sending BNB to my Metamask wallet was a breeze using this guide! I appreciate the clear steps provided here for transferring BNB tokens easily. Thanks for the helpful instructions!
Is it necessary to have a Metamask wallet set up before initiating the BNB transfer, or can I set it up during the process?
It is necessary to have a Metamask wallet set up before initiating the BNB transfer. You need to have your wallet ready to receive the BNB tokens. Setting up the wallet during the transfer process can lead to complications and delays. Make sure to follow the steps outlined in the guide to ensure a smooth transaction.
To send BNB to my Metamask wallet has always been a hassle, but this guide made it so much easier for me! The step-by-step instructions were clear and concise, and I was able to successfully transfer my BNB without any issues. Thank you for the helpful guide!
Sending BNB to my Metamask wallet was a breeze thanks to this easy-to-follow guide. I appreciate the detailed steps provided here, making the process smooth and secure. Now I can effectively manage my BNB tokens on the Metamask platform with confidence.
Sending BNB to your Metamask wallet is a straightforward process that empowers you to transfer your BNB tokens to the Metamask platform, enabling efficient fund management. By following a few simple steps, you will be able to effortlessly send BNB to Metamask and begin leveraging its functionalities.
Sending BNB to your Metamask wallet is a straightforward process that allows you to transfer your BNB tokens to the Metamask platform, where you can manage and utilize your funds efficiently. By following a few simple steps, you can effortlessly send BNB to Metamask and begin harnessing its functionalities.
Thanks for this detailed guide on sending BNB to Metamask! Setting up my wallet and initiating the transfer was much easier following these step-by-step instructions. This will definitely help me manage my BNB tokens more efficiently.
Sending BNB to my Metamask wallet was a breeze! I followed the steps outlined in this guide and successfully transferred my Binance Coin to MetaMask. Now I can easily manage my funds and take advantage of all the features. Highly recommend!
Is it necessary to memorize the seed phrase for the Metamask wallet or can it be stored securely in another format?
It is crucial to securely store your seed phrase for the Metamask wallet, as it is the key to accessing and controlling your funds. While you can explore different secure storage options, memorizing it can enhance protection against unauthorized access.
Sending BNB to your Metamask wallet is a straightforward process that empowers you to transfer your BNB tokens onto the Metamask platform for efficient fund management. By adhering to the outlined steps, you can effortlessly send BNB to Metamask and begin leveraging its functionalities.
Sending BNB to your Metamask wallet is a straightforward process that enables you to transfer your BNB tokens to the Metamask platform, where you can manage and utilize your funds efficiently. By following a few simple steps, you can effortlessly transfer BNB to Metamask and begin leveraging its functionalities.
Could you please clarify if there are any fees associated with sending BNB to MetaMask? I want to make sure I understand the cost implications before proceeding. Thanks!
Hi EmilySmith23, there may be minimal network fees involved when sending BNB to MetaMask due to the blockchain transaction fees. These fees can vary based on network congestion and gas prices. It’s advisable to check the current fee rates on the exchange or wallet you are using for a more accurate estimation. Hope this helps!
Sending BNB to my Metamask wallet was so easy! I followed the step-by-step guide and had my tokens transferred in no time. Metamask is a great platform for managing my crypto assets.
Sending BNB to your Metamask wallet is such a breeze! I recently followed this guide and had no issues whatsoever, plus the process was super smooth. Highly recommend it to anyone looking to manage their BNB tokens easily.
I just followed this guide to send BNB to my MetaMask, and it worked perfectly! The steps were very clear and easy to follow. I appreciate the reminders about keeping the seed phrase safe. Thanks for the helpful information!
I just followed this guide, and it made sending BNB to my MetaMask wallet super easy! The steps were clear, and I really appreciated the tips on keeping my seed phrase safe. I feel more confident managing my crypto now. Thanks for creating such a straightforward resource!
Thanks for the guide! I’m a bit confused about how I can find my Metamask BNB address. Do you have any tips on navigating the extension to locate it quickly?
Hey SarahNerdy, no worries! To find your Metamask BNB address, just open the MetaMask extension and click on the circular account icon at the top. It should display your account details, and you can select “Copy Address” from there to quickly grab your BNB address. Let me know if you have more questions!
I recently followed this guide to send my BNB to MetaMask, and I found it super helpful! The steps were easy to understand, and I appreciate the emphasis on securely storing the seed phrase. Now I can manage my tokens effortlessly. Thanks for putting this together!
I’ve just followed this guide to send my BNB to MetaMask, and it worked perfectly! The steps were clear and easy to follow. I’m really impressed with how straightforward the process is. Can’t wait to start using my BNB on the platform!
Sending BNB to my MetaMask was surprisingly easy! I followed the steps in this guide, and it worked flawlessly. I appreciate how clear and simple the instructions are. Now I can manage my funds more conveniently. Highly recommend!
I just followed the steps to send my BNB to MetaMask, and it worked perfectly! The guide made it so simple to understand. I’m really excited to start using my MetaMask wallet for all my transactions. Highly recommend this article for anyone looking to move their crypto easily!
I just followed this guide to send BNB to my Metamask, and it was incredibly straightforward! The steps were clear and easy to understand. I appreciate how you emphasized the importance of checking the address before confirming the transfer. It really helped me avoid mistakes. Great job!
I just followed this guide to send BNB to my MetaMask wallet, and it was incredibly easy! The steps were clear and straightforward, making the whole process stress-free. I really appreciate how detailed it was; I felt confident the whole time. Definitely recommend this to anyone who’s new to crypto!
I just followed this guide to send BNB to my Metamask wallet, and it worked perfectly! The steps were super clear and easy to understand. I appreciate the emphasis on securely storing the seed phrase – it’s such an important part of wallet safety. This has made managing my funds a lot simpler. Thanks for putting this together!
I just transferred some BNB to my Metamask wallet following this guide, and it was super easy! I appreciate how clear the steps were. Highly recommend this for anyone looking to manage their BNB more effectively.
I’ve recently transferred my BNB to Metamask using this guide, and it was super straightforward! I loved how clear the instructions were—definitely made me feel more confident in the process. Just a heads-up, double-check your BNB address before hitting send; I almost made a mistake there! Overall, I highly recommend this method for managing your tokens.
I found this guide really helpful! Sending BNB to my MetaMask wallet was easier than I expected. The step-by-step instructions made it simple to follow. I appreciate the emphasis on securing the seed phrase—definitely an important reminder! Thanks for sharing!
This guide made sending BNB to my MetaMask wallet super straightforward! I really appreciate the clear steps, especially on how to find my BNB address. I had been hesitant because of some complicated instructions I’d seen before, but this was a breeze. Thanks for sharing!
I just followed this guide to send my BNB to Metamask, and it couldn’t have been easier! The steps were straightforward, and I appreciated the clear instructions on finding my BNB address. Now I’m all set to manage my tokens! Highly recommend for anyone new to crypto wallets.
I found this guide super helpful! Sending BNB to my Metamask wallet was easier than I expected. Just make sure to double-check your address before confirming the transfer! Great job on breaking it down step by step!
I just followed this guide, and sending BNB to my MetaMask wallet was super simple! The steps were clear and easy to understand. I recommend everyone to try it, especially if you’re new to crypto. Just make sure to double-check your address before confirming the transfer – it’s crucial!
I’ve been using MetaMask for a while now, and transferring BNB was a breeze! The step-by-step guide made it super easy to follow. Just remember to double-check your address before confirming the transfer. Can’t wait to explore more features!
I just transferred my BNB to MetaMask using this guide! It was super straightforward and I love how easy it is to manage my funds now. Thanks for the detailed steps—definitely recommend this process to anyone looking to get started with MetaMask!
I just followed this guide to send BNB to my MetaMask, and it was super easy! The steps were clear, and I really appreciate the emphasis on confirming the address before finalizing the transfer. It’s crucial to avoid mistakes. Now I can manage my funds efficiently. Great resource for newcomers!
I just followed this guide to send BNB to my MetaMask wallet, and it was super straightforward! The steps were clear and easy to understand. I love how Metamask makes managing my crypto so simple. Definitely recommend this guide to anyone new to crypto!
I’ve just followed this guide to send my BNB to MetaMask, and it was super straightforward! I appreciate how clear the steps were—especially setting up the wallet. Now I feel much more confident managing my tokens. Thank you for sharing this!